
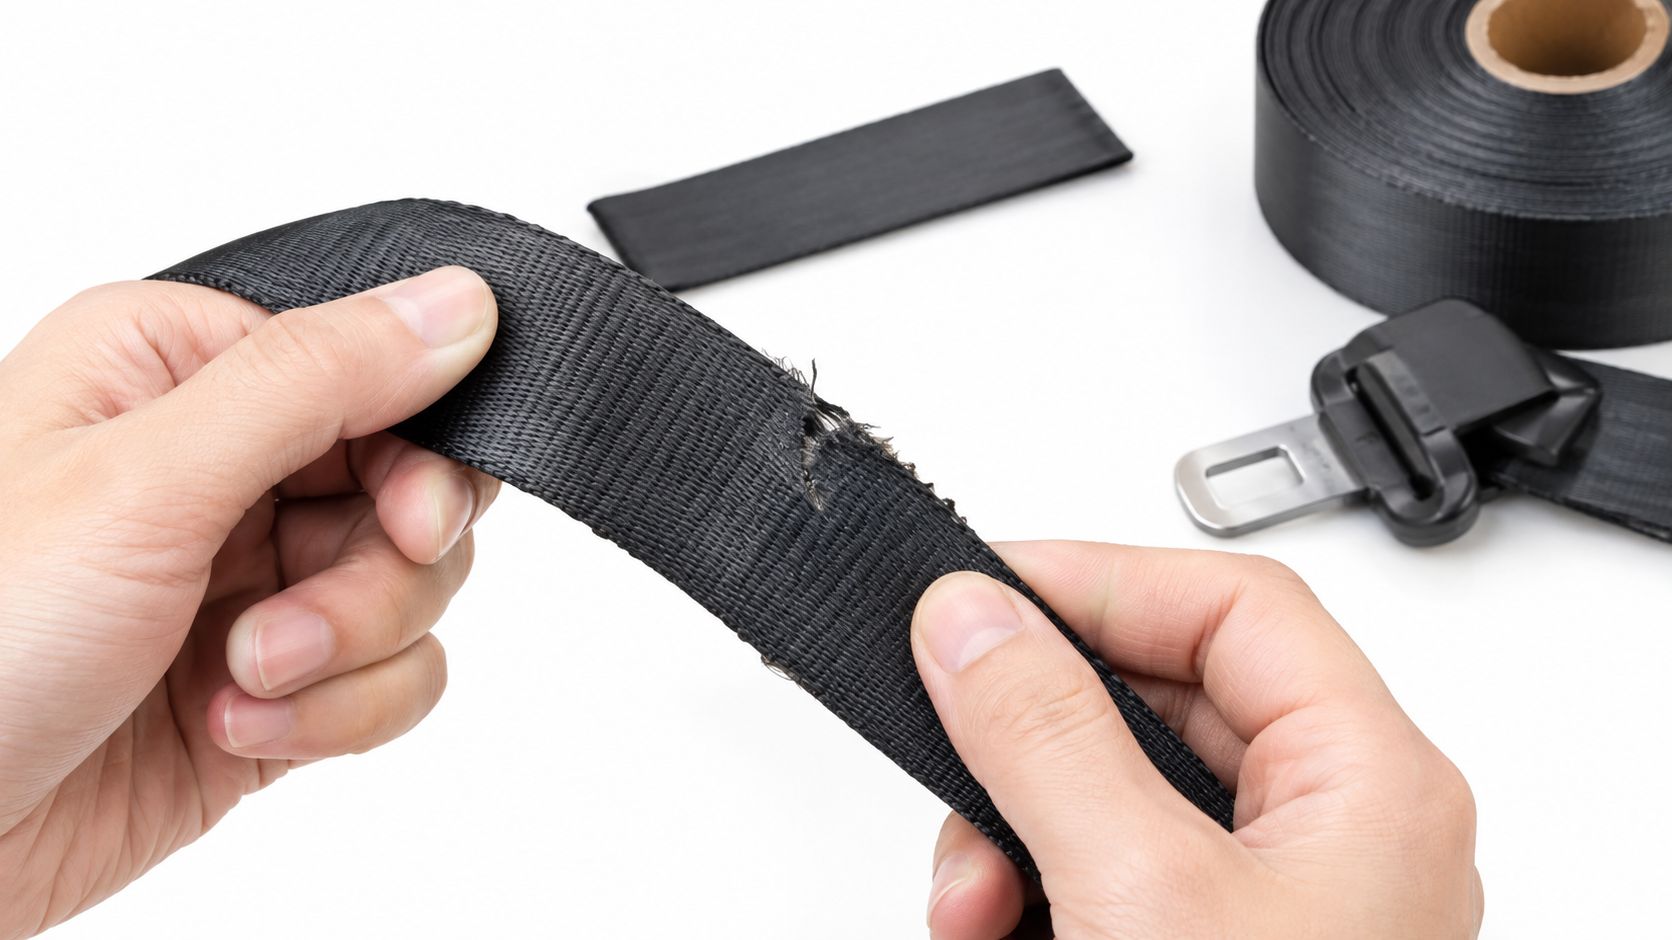
You pull the shoulder belt across your chest, and your hand catches a fuzzy edge, a small nick, or a spot that feels stiff instead of smooth. That's the kind of moment that makes people wonder whether they're looking at a harmless blemish or a belt that's no longer safe to trust.
Seat belt webbing damage deserves a closer look because the webbing is the part doing the work in a crash. It can latch, retract, and look normal from a few feet away and still have lost strength where it matters. If you've ever brushed off a frayed belt as “just wear,” this guide will help you judge it the way an inspector would, by fiber condition, location, and deformation, not by guesswork. If you're also sorting out the paperwork after a crash, SMB Law's personal injury claim guide is a useful place to understand how vehicle damage and injury claims can connect.
Table of Contents
- Why Seat Belt Webbing Damage Matters More Than It Looks
- What Seat Belt Webbing Actually Does
- Common Types of Webbing Damage and What They Mean
- How to Inspect a Seat Belt for Hidden Damage
- Repair or Replace the Whole Belt
- How Mail-In Seat Belt Webbing Replacement Works
- Quick Reference Checklist and Common Questions
Why Seat Belt Webbing Damage Matters More Than It Looks
Seat belt webbing is not trim. It's the load-carrying strap that keeps your body from moving forward too far in a sudden stop, and federal safety rules treat damage as a measurable loss of performance rather than a cosmetic flaw. Under FMVSS No. 209, webbing must keep at least 75% of its unabraded breaking strength after standardized abrasion testing, and for Type 2 belts the standard sets a minimum breaking strength of 17,793 N, about 4,000 pounds-force, before that post-abrasion threshold is applied. Cornell's text of 49 CFR 571.209 shows why a belt can still click in and retract while no longer offering the margin it was designed to provide.
The part you actually depend on
That matters because the webbing is the only part that spreads crash load across your shoulder and lap. If fibers are cut, stretched, or abraded near high-contact points, the belt may still “work” in the everyday sense but lose reserve strength under load. In plain terms, a belt that looks serviceable can still be compromised where you can't see it.
Practical rule: if the damage is in the webbing, treat it as a structural issue first and a cosmetic issue second.
For a first-time car owner, that can feel counterintuitive. The retractor still pulls back. The buckle still clicks. Yet the webbing can be the weak link, especially near the buckle, adjuster, trim opening, or retractor entry point where the belt rubs every day. That's why inspection guides focus on the fabric itself, not just the hardware around it.
The rest of this article follows the same logic inspectors use, starting with how the belt is built, then what different kinds of damage mean, then how to decide whether to replace or re-web it. If you've been tempted to trim a fuzzy edge and call it good, keep reading. The wrong fix can make a safe-looking belt less trustworthy than the damaged one you started with.
What Seat Belt Webbing Actually Does
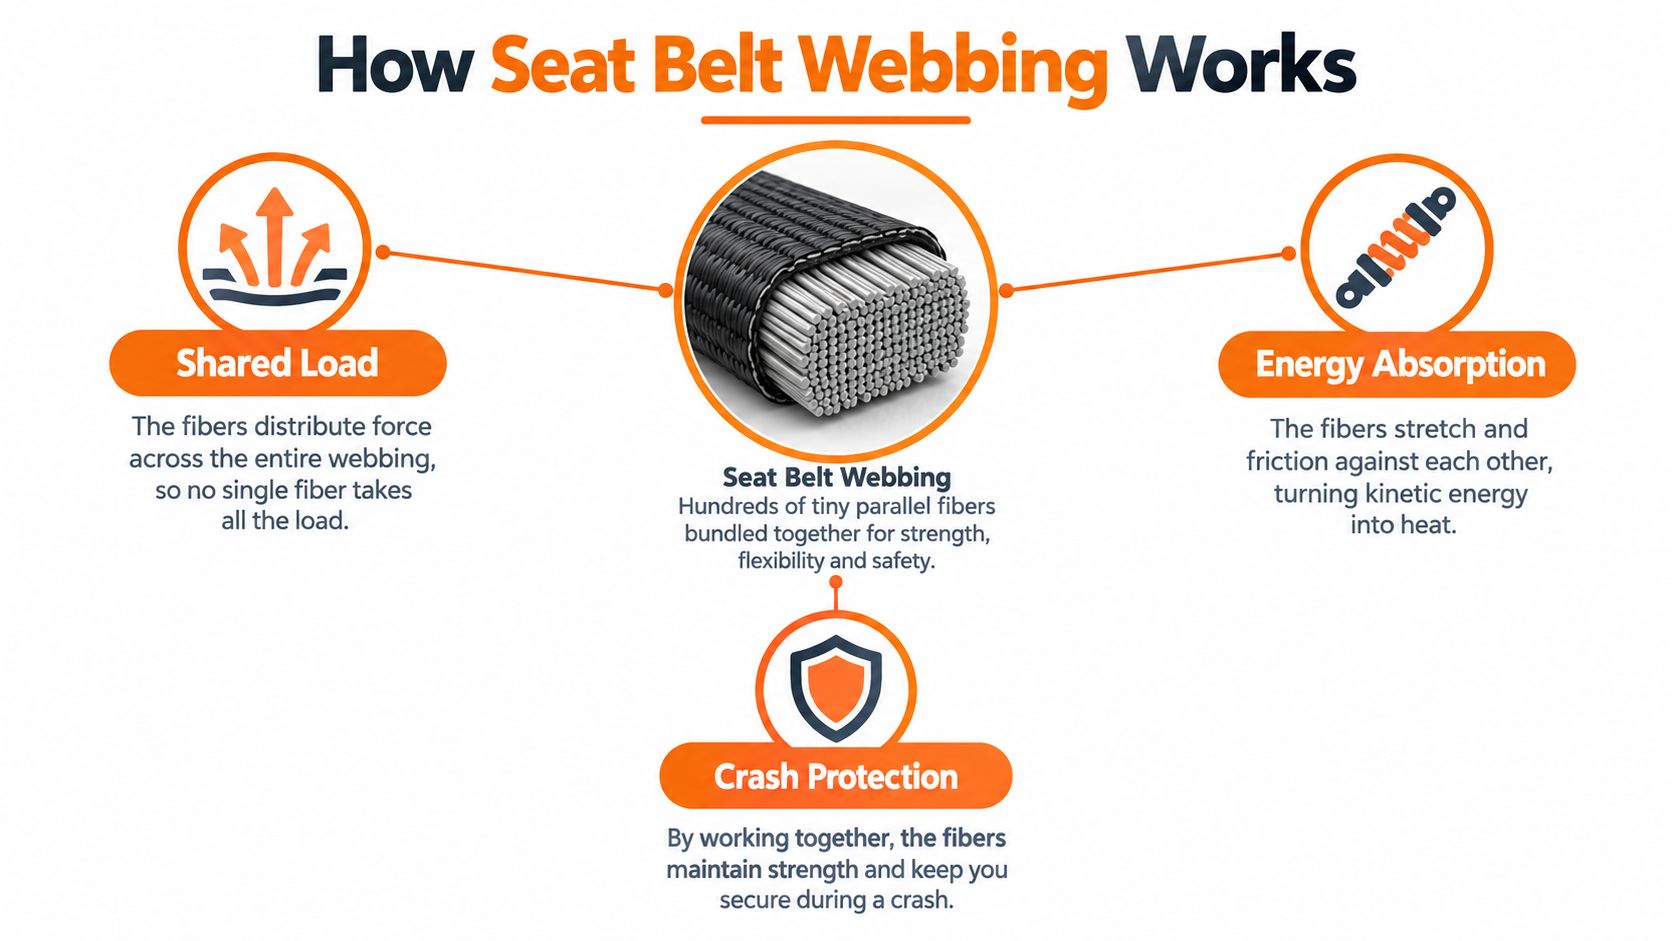
Think of the webbing as a wide bundle of tiny parallel ropes woven into one strap. In normal driving, it feels flat and flexible because those fibers share the load evenly, and in a crash they're designed to stretch in a controlled way so the occupant's energy gets absorbed instead of transferred all at once.
Where the webbing lives in the restraint system
The fabric itself runs from the retractor up through a pillar guide or height adjuster, then across the torso to the latch plate and buckle. It's the visible path of the restraint, which is why damage often shows up first at points where the webbing bends, rubs, or folds. A healthy belt should move smoothly along that route without twisting, curling, or snagging.
A useful way to picture it is this, each woven strand shares the job. If a small cut removes some of those strands, the remaining fibers carry more force. That doesn't sound dramatic until you remember how much load a restraint sees in a sudden stop.
The belt doesn't need to be shredded to be weaker. A few damaged fibers in the wrong place can change how the whole strap behaves.
That's also why the webbing material matters so much. It's built to have predictable stretch and return, which helps the system manage crash energy in a repeatable way. If the weave gets distorted by heat, chemicals, or stretching, the belt may no longer elongate the way the system expects. Once that happens, the belt isn't just worn, it's mechanically different.
Common Types of Webbing Damage and What They Mean
Fraying and pulled threads
Fraying usually starts at an edge, where the weave begins to lift into fuzzy fibers or loose tufts. Light edge fluffing can be minor, but heavy fraying or pulled threads is another matter because those loose fibers show that the outer weave is unraveling. New Zealand's inspection guidance treats heavy fraying, pulled thread tufts, cuts, tears, deformation, stretching, fading, and contamination as performance concerns, while the U.K. MOT manual flags obvious cuts and damage as defects. New Zealand's seatbelt guidance and the UK MOT manual both show that inspectors care about what the fibers are doing, not just whether the belt still lies flat.
Cuts, nicks, and edge damage
Cuts are more serious because they interrupt the load-carrying fibers directly. The U.K. manual says cuts on either edge exceeding 2 mm are likely to reduce strength significantly, and cuts away from the edges become a deficiency when they're obviously greater than 4 mm. That edge detail matters, because the edges are where the fibers are most exposed to snagging and tearing.
Stretching, deformation, fading, and contamination
Overstretching is a different kind of problem. A belt that looks longer, rippled, curled, or oddly shaped may have been heat-affected, crash-loaded, or chemically altered. Inspection guidance also treats severe fading, stiffness, grease, paint, solvent exposure, and similar contamination as warning signs because the weave can lose its predictable behavior even when it still looks intact.
What looks cosmetic versus what looks structural
Mild edge fuzz, slight discoloration, or ordinary aging can be cosmetic. Heavy fraying, distorted weave, visible cuts, or stiffness are different. If the fibers are no longer lying in a clean, flat pattern, the belt is telling you that the load path may have changed.
A simple way to separate the two is to ask whether the damage is only surface-deep or whether it affects the shape, texture, or continuity of the weave. The second category deserves much more respect.
How to Inspect a Seat Belt for Hidden Damage
Start with the belt fully extended. Pull it all the way out of the retractor so you can see the entire length, then work from one end to the other without rushing. NHTSA recall instructions use exactly that kind of method because some damage is easier to feel than to see.
Use your eyes first, then your hand
Look at both faces of the webbing and both edges. Run an ungloved fingertip along the strap and pay attention to rough patches, thinning, hard spots, rippling, or changes in texture. A belt that feels smooth and even is one thing. A belt that feels fuzzy in one spot and stiff in another is telling you the weave has changed.
Pay special attention to the places that wear fastest.
- Buckle area: check the section that repeatedly bends near the latch plate.
- Height adjuster or pillar guide: look for abrasion where the belt changes direction.
- Retractor entry point: inspect where the webbing disappears into the housing.
- Anchor vicinity: look for hidden scuffing or distortion near the lower end.
Watch for function changes, not just visible damage
A belt can look almost normal and still retract poorly. Slow return, hesitating movement, or a belt that doesn't lie flat after use can indicate abrasion, contamination, or weave distortion. That's why a “works fine” verdict based only on clicking the buckle is too shallow.
Good inspection habit: if you need to trim, tug, or smooth the webbing to make it look normal, it's already past casual wear.
For context on how drivers often think after a collision, Bell Law's Oregon car accident steps guide is a helpful reminder that vehicle safety checks belong in the first round of post-crash decisions, not after the car is back in service. A seat belt that only seems fine shouldn't get a pass just because it hasn't fully failed yet.
Repair or Replace the Whole Belt
There's a hard line between a compliant fabric replacement and a cosmetic patch. FMVSS No. 209 governs strength, elongation, width, durability, and related requirements for the restraint assembly, and NHTSA warns that a repair that hurts compliance can run into the federal render inoperative rule. NHTSA's interpretation on repairs and compliance is the reason a neat-looking DIY fix can still be the wrong fix.
What cosmetic repairs get wrong
Trimming frayed edges, sewing over cuts, gluing down loose fibers, dyeing faded webbing, or melting rough spots may improve appearance, but they don't restore original certified strength. They can also change stitching behavior, width, routing, or elongation, which is exactly what the safety standard cares about. If the fabric has already lost fibers, a cosmetic fix just hides the problem.
When the whole assembly needs replacement
If the belt was crash-loaded, deployed with a pretensioner, or shows structural distortion, the whole unit belongs out of service. The same is true if the damage extends beyond the webbing and into the retractor, buckle, or pretensioner system. In those cases, fabric replacement alone doesn't tell you that the restraint is safe again.
When re-webbing can make sense
If the hardware is still intact and the damage is limited to the fabric, re-webbing the existing assembly can be a compliant solution. That approach keeps the original hardware in place while replacing the worn strap with correct-spec webbing, which is very different from a home repair. It also makes sense where a full OEM assembly is expensive or hard to find for older vehicles.
For collision work, one rule keeps people out of trouble, don't try to make damaged webbing look new, make it meet the original function again. If you can't do that with the right material and stitching, replacement is the safer answer.
How Mail-In Seat Belt Webbing Replacement Works
A mail-in service follows the same sequence a customer does. Identify the belt, order the correct item, remove the assembly from the vehicle, ship it in, receive it back with new webbing, and reinstall it. Some services keep the pricing simple with a flat per-item rate, which helps when you are comparing repair options instead of shopping for a full replacement.
The idea is to preserve the original assembly and renew only the strap. The retractor, pretensioner, latch plate, anchor hardware, and identifying tags stay with the vehicle-specific unit, while the damaged fabric is replaced. That matters because fitment and system compatibility belong to the assembly, not just the webbing.
A careful mail-in replacement also depends on how the new strap is sewn and routed. The webbing has to match the original specification closely enough that the belt behaves the way it did before the damage. A DIY splice usually does the opposite, because it interrupts the weave, changes the load path, and leaves no real confidence that the belt will perform as intended. A belt can look tidy and still be wrong in the only way that counts.
That is why repair shops and RV builders often pay attention to turnaround and parts sourcing as much as visible bodywork. A Class A RV Repairs collision shop is one example of the kind of repair environment where getting a component back in service matters as much as the rest of the job.
Mail-in webbing replacement is not the answer when the belt also has deployment-related faults tied to the pretensioner or a locked module. Fabric can be renewed, but hidden crash-system problems need their own diagnosis before the restraint goes back in the vehicle.
Quick Reference Checklist and Common Questions
Before you drive, check the belt with your eyes and fingers. Look for fraying, cuts, pulled threads, stiff spots, curling, discoloration, and contamination. Pull the belt fully out, feel both faces and both edges, and make sure it retracts smoothly without sticking.
- If the damage is on the edge: treat it seriously, because edge cuts and fraying often reach the load-bearing fibers first.
- If the belt feels stiff or rippled: assume the weave may be altered, even if there's no tear.
- If the belt retracts slowly: inspect the full path, especially at the guide and retractor entry point.
- If you can see heavy fraying or a cut: don't keep using it and hoping it settles down.
A few common questions come up again and again. Can a seat belt fail a safety inspection for webbing damage alone? Yes, many inspection systems treat visible damage as a defect. Is insurance likely to cover replacement? Sometimes, but that depends on the claim and policy. How do you know if the damage came from a previous accident? Often you can't tell from looks alone, which is why hidden deformation matters. Are child-seat belts judged more strictly? Yes, inspection guidance gives child restraints extra caution because the consequence of compromised webbing is higher.
The next related topic is pretensioner and SRS module reset, because belt fabric damage is only one part of the restraint system.
If your belt shows fraying, cuts, or hidden wear, Safety Restore can re-web the original assembly and return it ready for reinstall. Visit Safety Restore to see the webbing replacement service, compare the repair path with full replacement, and send in the belt before a small defect turns into a bigger safety problem.

